






Contents
- 1 A complete guide to opening a Bitget account, with step-by-step instructions and images
- 2 Open a Bitget account
- 2.1 Go to the Bitget account creation page
- 2.2 Enter your registration information
- 2.3 Perform game authentication
- 2.4 Enter the verification code
- 2.5 Proceed to the Know Your Customer (KYC) screen
- 2.6 Tap "Authenticate"
- 2.7 Select your country of residence
- 2.8 Select the type of identification document
- 2.9 I agree to the handling of my personal information
- 2.10 Allow camera use
- 2.11 Take a picture of the front of your identification document
- 2.12 Approve the contents of the surface photograph
- 2.13 Take a picture of the back of your identification document
- 2.14 Approval of the photo on the back
- 2.15 Identity verification document upload complete
- 2.16 Started taking the person's photo
- 2.17 Take a photo of yourself for facial recognition
- 2.18 Wait for the review results
- 2.19 Confirm that the review is complete
- 2.20 Obtain your account number (UID)
- 3 Register your account from your MoneyChat My Page (required)
A complete guide to opening a Bitget account, with step-by-step instructions and images
This guide explains how to open a new account with Bitget, using easy-to-follow diagrams and smartphone screenshots
Bitget allows you to easily open an account and set up cashback by following the instructions
Follow the steps below to open an account and apply for one
- How to open an account with Bitget
- How to apply for an account with MoneyChat
Part 1
Open a Bitget account
First, you need to open a Bitget account. Please follow the instructions below and open an account via the dedicated link provided by the button
Step 1
Go to the Bitget account creation page
First, click the button below to go to the Bitget account creation page. When you open the link, the Bitget registration form will be displayed
*Please note that if you register through a link other than the one provided by Moneycha, you will not be able to receive cashback from Moneycha
Step 2
Enter your registration information
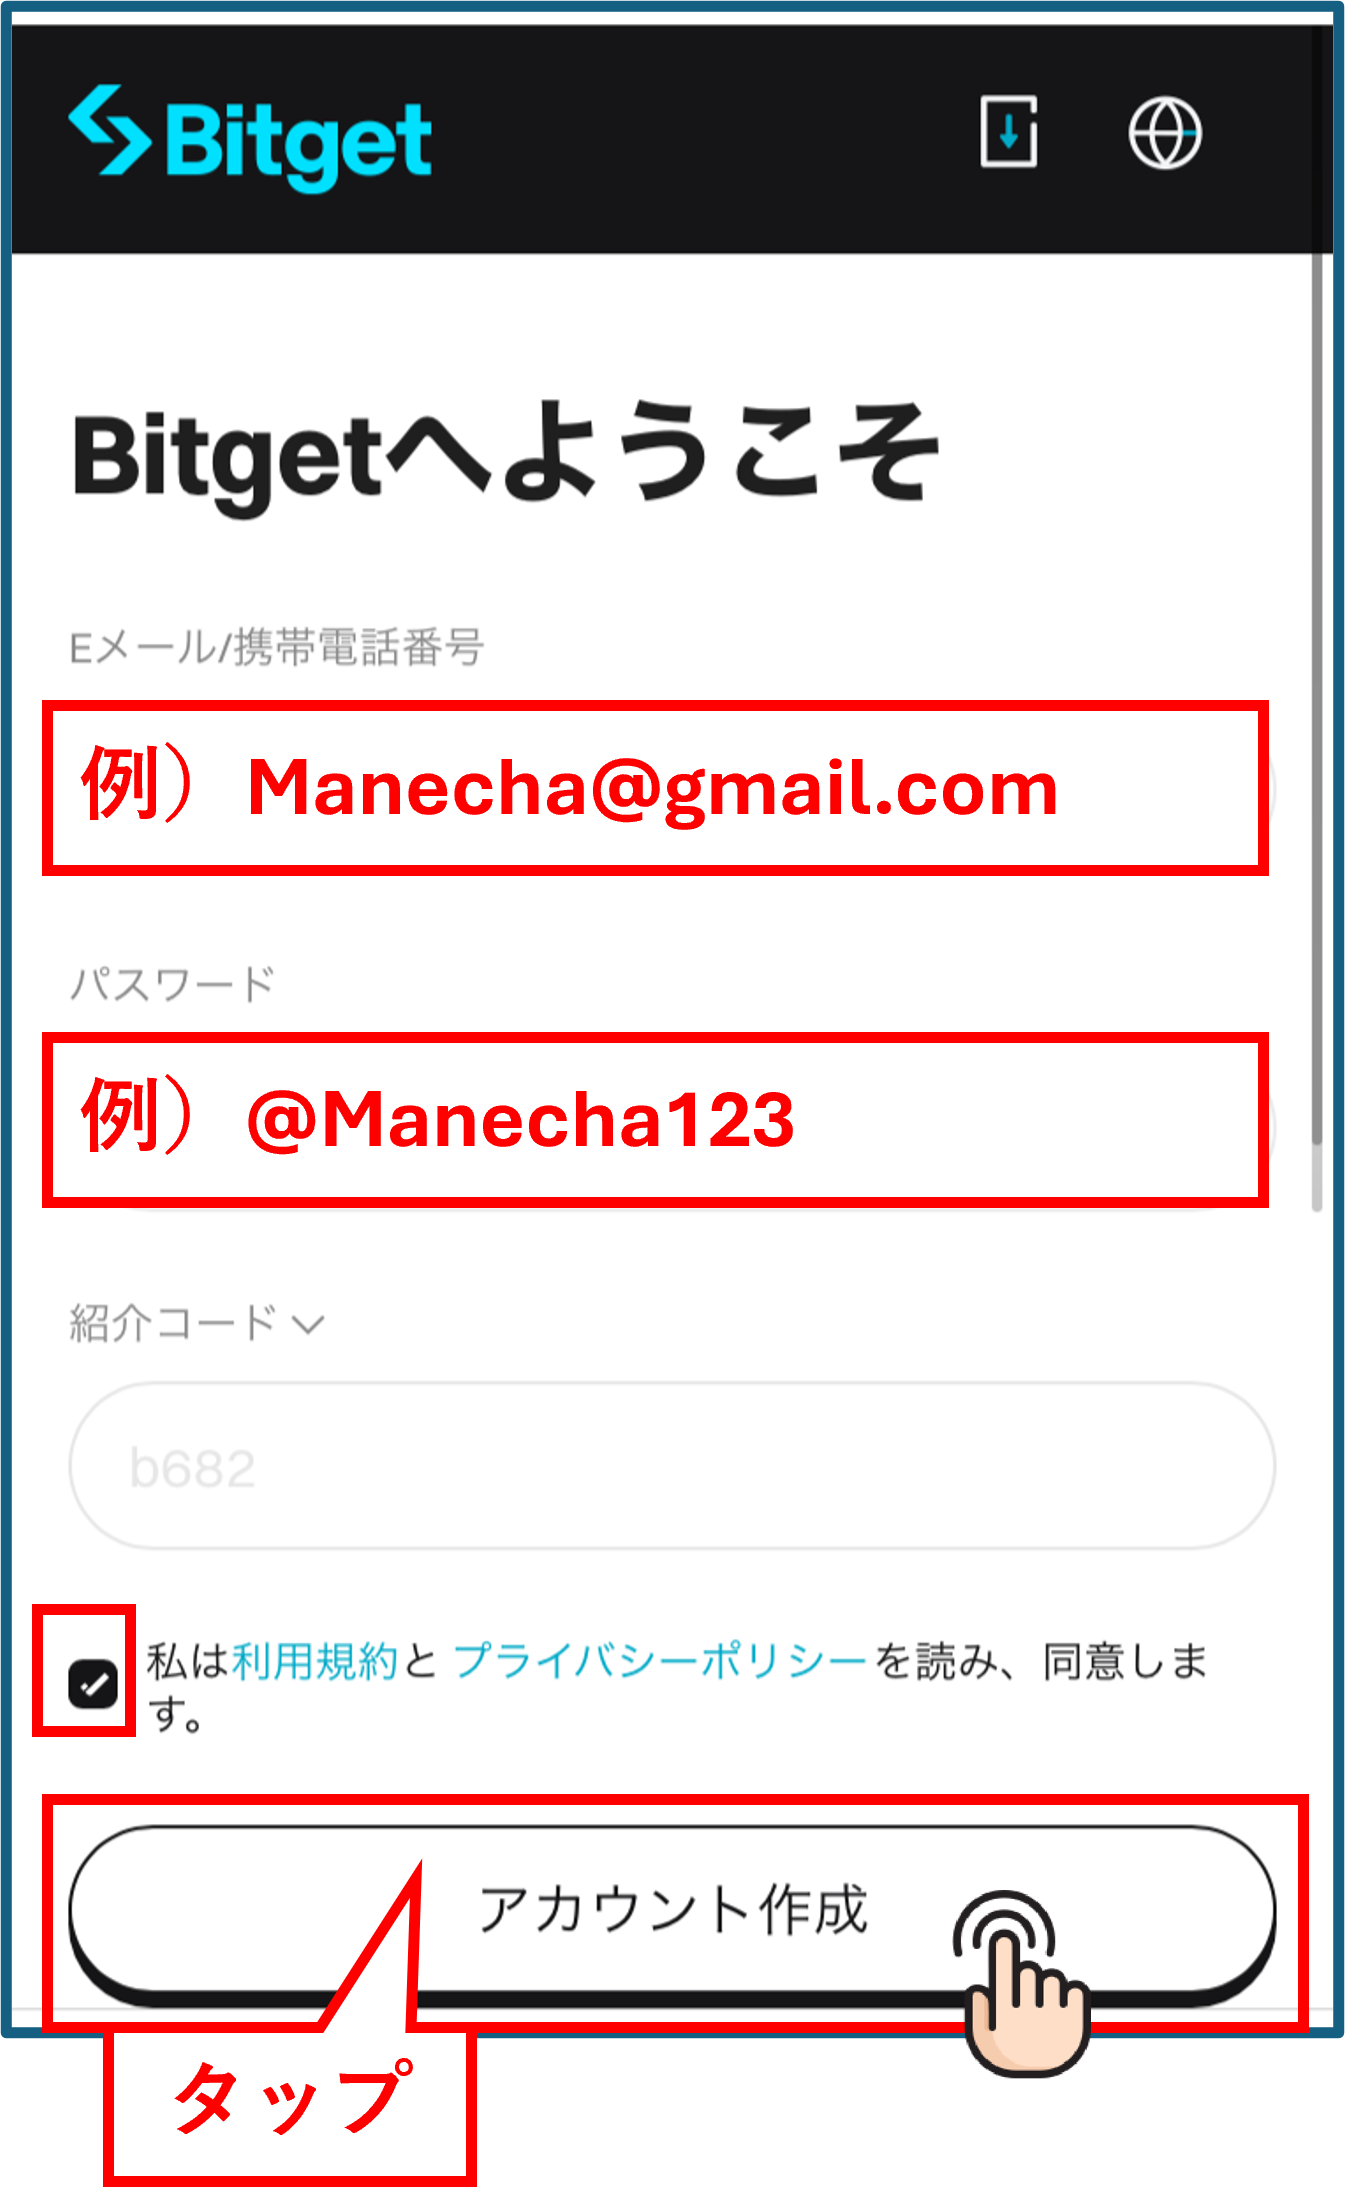
Enter your email address and password, then tap the "Create Account" button
*Please be sure to write down your registered email address and password, as you will need them to log in
Step 3
Perform game authentication
A game verification screen for bot prevention will appear. Tap the images on the screen in the order shown in the diagrams in the upper right corner. Once you have finished tapping, tap the "Confirm" button to proceed
Step 4
Enter the verification code
A verification code will be sent to the email address you entered on the previous screen. Please enter that verification code on the screen and tap the "Register" button
*If you do not receive the email, please check your spam folder
Wi5
Proceed to the Know Your Customer (KYC) screen
Once your account creation is complete, you will proceed to verify your identity (KYC) documents. Please follow the instructions on the screen to begin the process
Step 6
Tap "Authenticate"
On the next screen, tap the "Authenticate" button to proceed to the identity verification document submission process
Step 7
Select your country of residence
A screen will appear asking you to select your country of residence. Select "Japan" and tap the "Continue" button to proceed
Step 8
Select the type of identification document
On the ID type selection screen, select the type of identity verification document you will be submitting. If you are using a My Number Card, select "ID Card". After making your selection, tap the "Continue" button
*You can choose from a driver's license, passport, or My Number Card (ID card)
Step 9
I agree to the handling of my personal information
An explanation regarding the handling of personal information will be displayed. Please review the content, check the box to agree, and tap the "Next" button
Step 10
Allow camera use
You will be asked to allow your smartphone camera to be used to photograph your identification documents. Please tap "Allow" to grant permission to use the camera
Step 11
Take a picture of the front of your identification document
Once the camera is activated, position the front of your identification document within the frame on the screen and take a picture
*Please ensure that all four corners of the document are visible in the image and that the text is clearly legible
Step 12
Approve the contents of the surface photograph
Review the photos you've taken, and if there are no problems, tap the "Approve" button to proceed. If you need to retake the photos, please do so again
Step 13
Take a picture of the back of your identification document
Next, take a picture of the back of your identification document, making sure it fits within the frame on the screen
Step 14
Approval of the photo on the back
Review the photo of the back of the item you took, and if there are no problems, tap the "Approve" button to complete the upload
Step 15
Identity verification document upload complete
This screen will appear once your identity verification documents have been uploaded. Next, you will proceed to take your photo
Step 16
Started taking the person's photo
A screen for taking a selfie will appear. Please follow the on-screen instructions to begin taking the photo
Step 17
Take a photo of yourself for facial recognition
Take a picture while slowly rotating your head so that a green line surrounds the entire circle displayed on the screen
*Please take the photo in a well-lit area so that your face is clearly visible
Step 18
Wait for the review results
Once you have uploaded your identity verification documents and photo, this screen will appear. Please wait about an hour for the review results
Step 19
Confirm that the review is complete
Once the review is complete, this screen will appear. Tap the account icon (face icon) on the screen to proceed to the account information screen
Step 20
Obtain your account number (UID)
Your account number (UID) will be displayed on the account information screen, so tap the copy icon on the right to note down the UID. Congratulations, your Bitget account opening is now complete
*This account number (UID) will be needed for registering your MoneyChat account in Part 2, so please make a note of it or take a screenshot
Part 2
Register your account from your MoneyChat My Page (required)
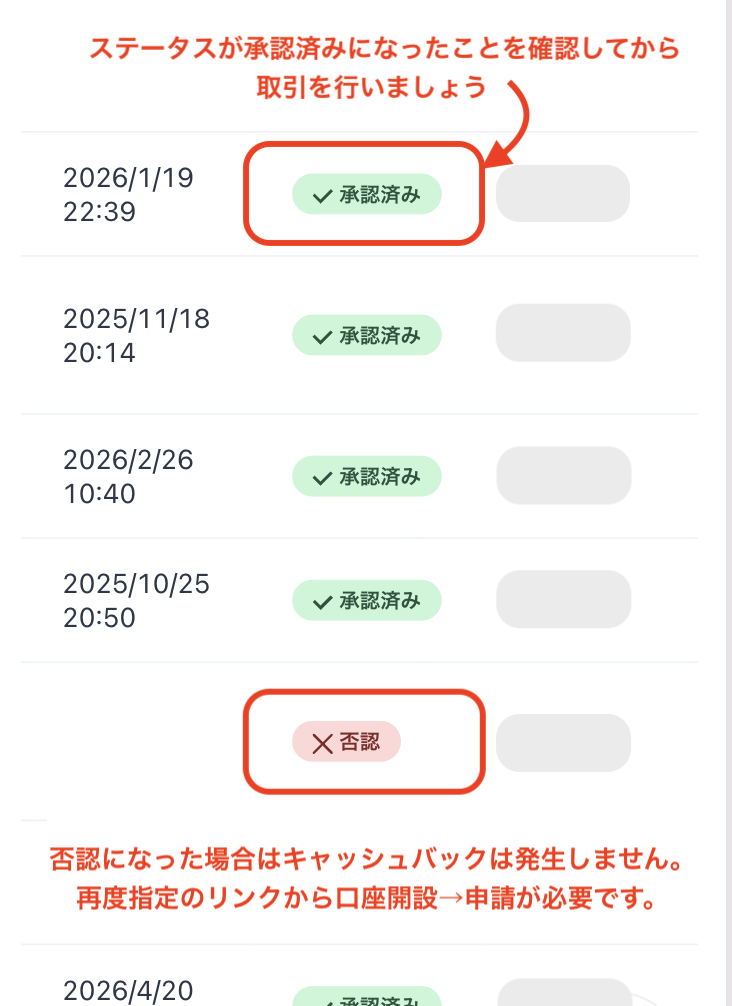
If you forget this step, you will not receive the cashback. Be sure to apply from your MoneyChat My Page and confirm that the status has changed to "Approved" before trading
Step 1
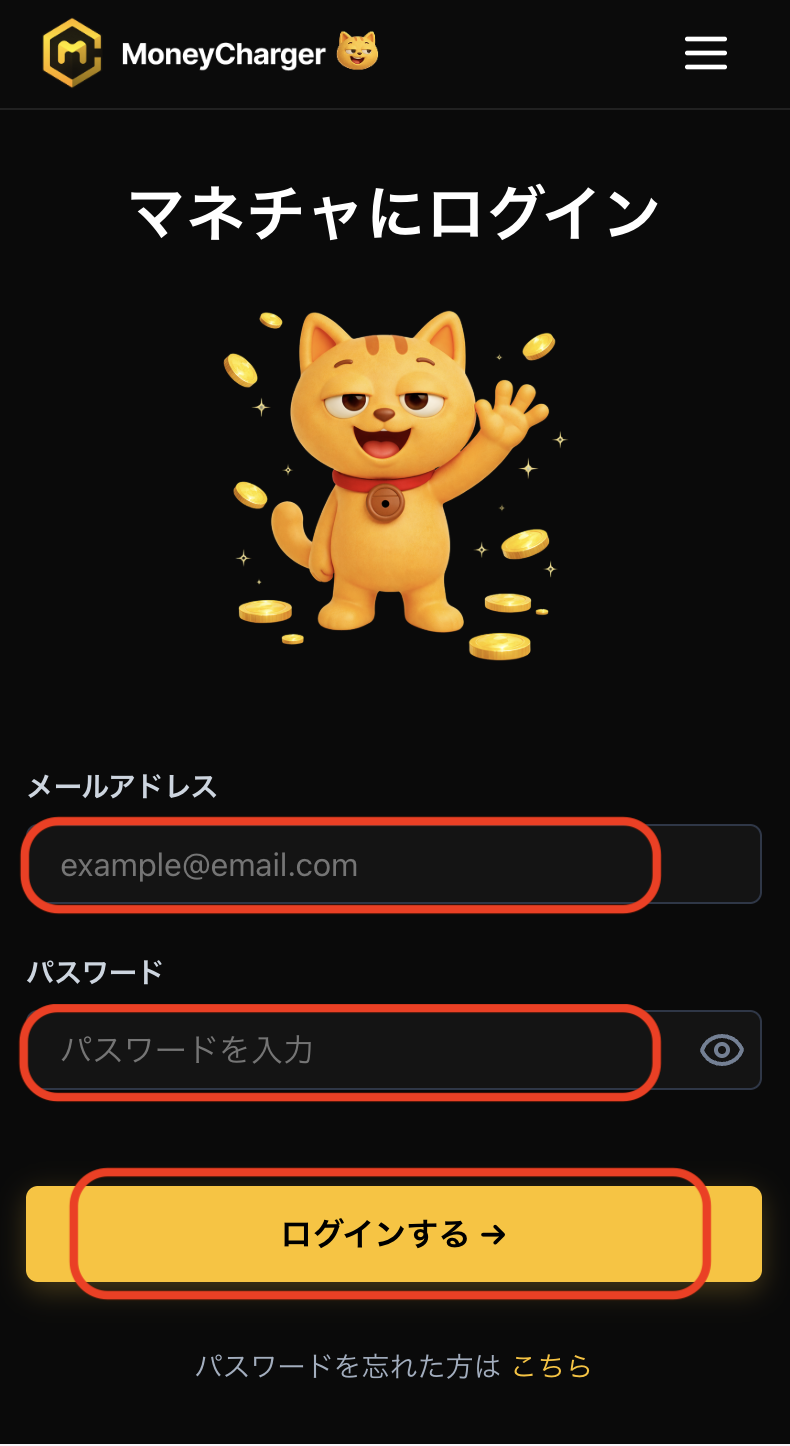
Log in to your MoneyChat My Page
Log in to the MoneyChat page from the login page
Step 2
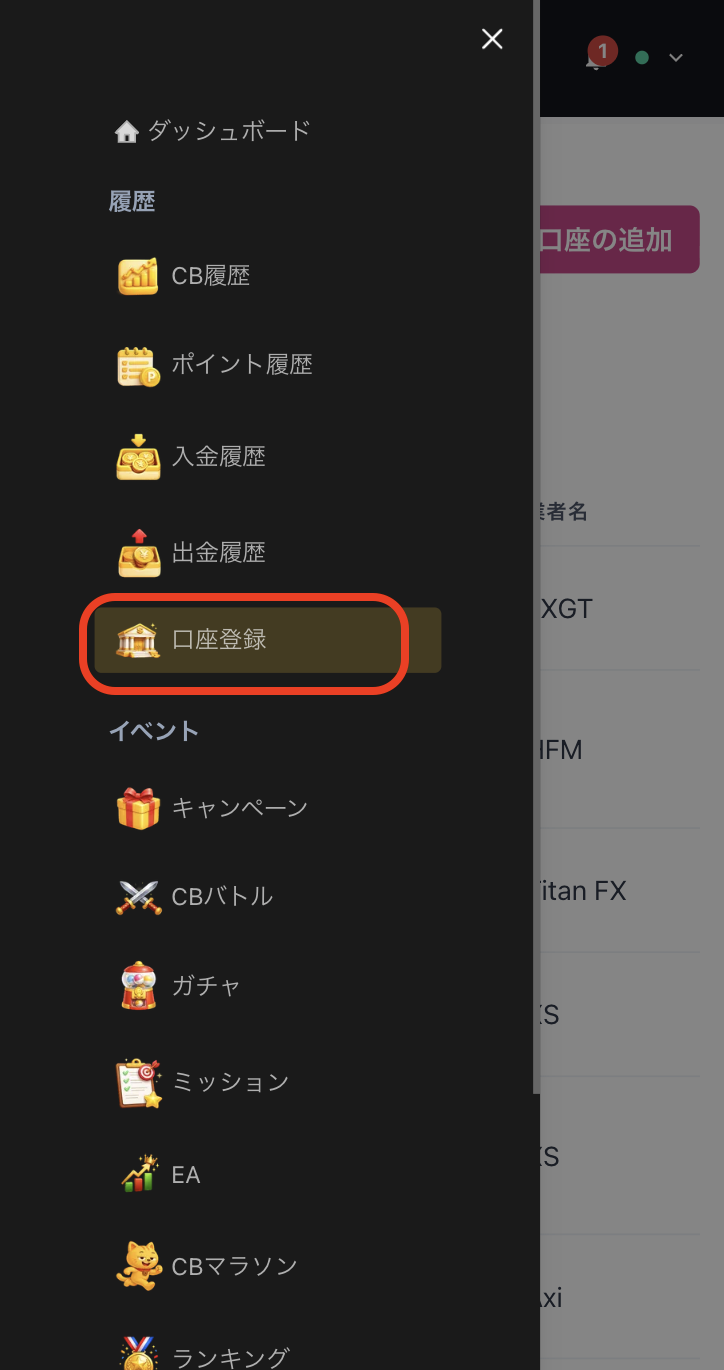
Select "Register Account" from the menu
Tap the three lines in the upper left corner of the screen to bring up a menu, then select "Register Account" from there
Step 3
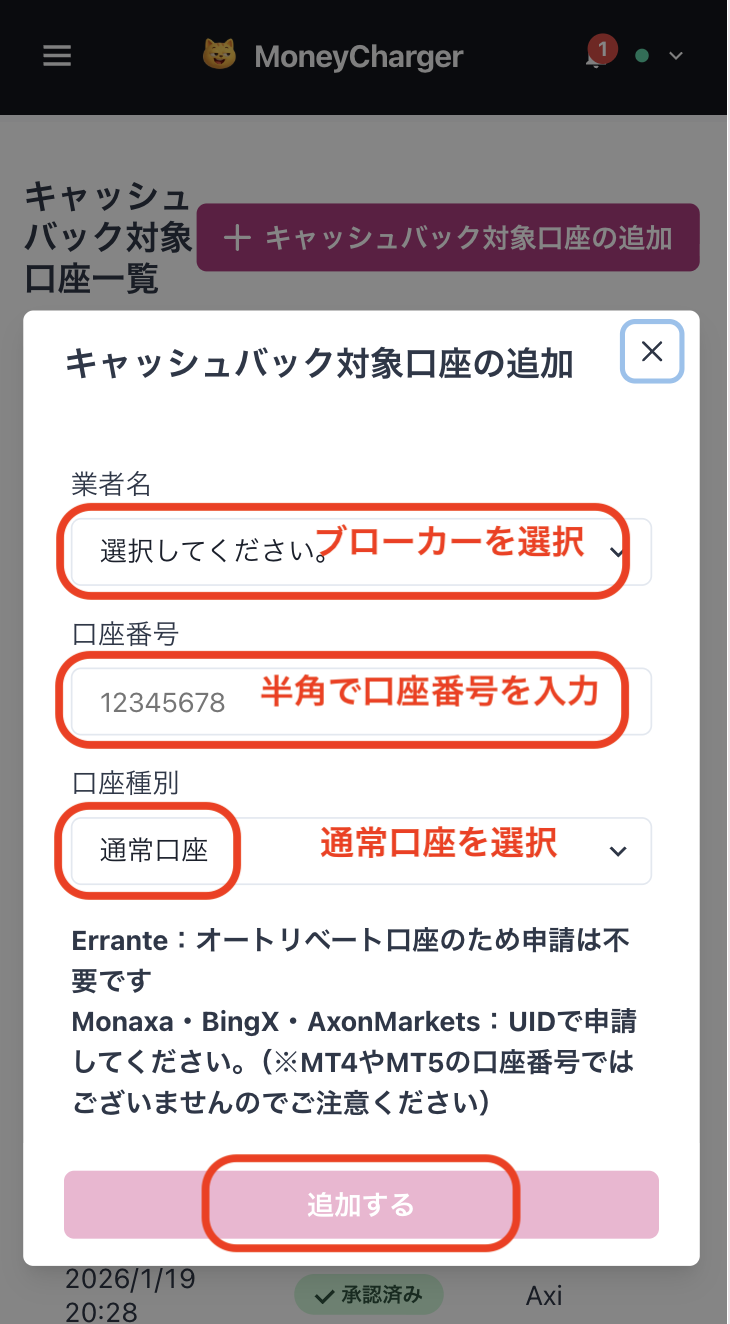
Select a broker and enter your account number
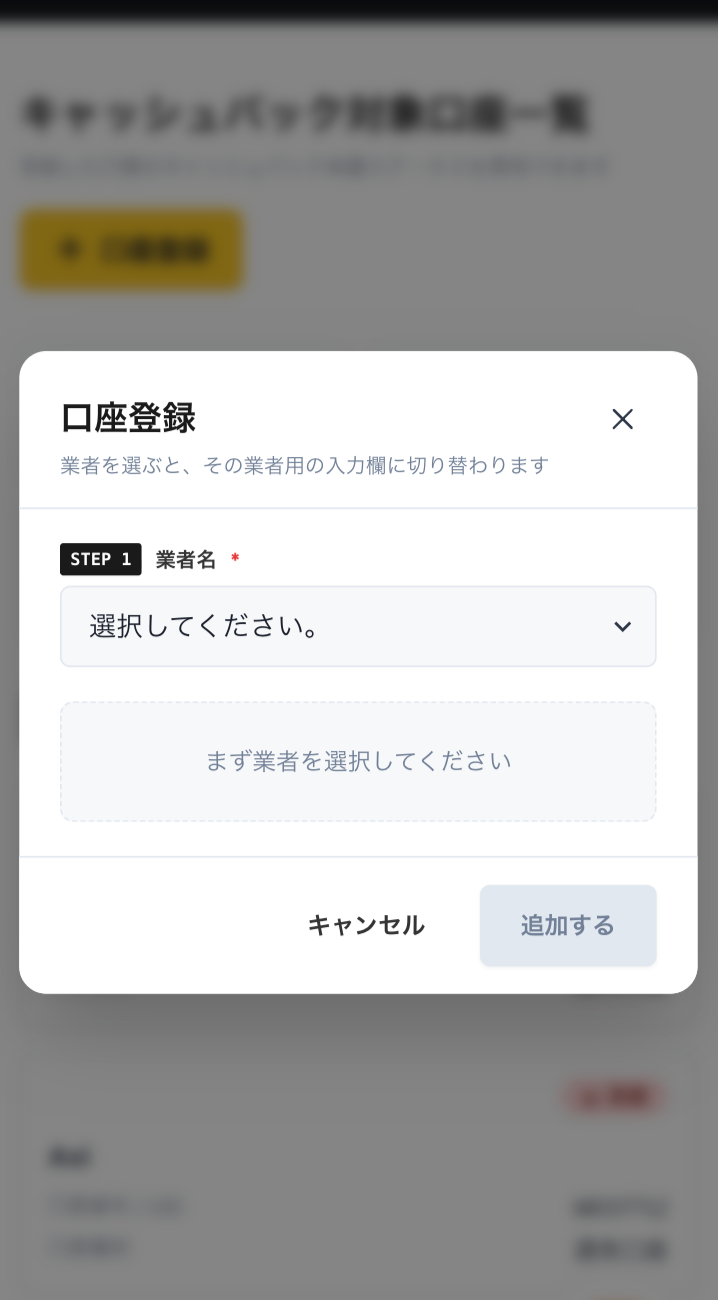
A menu like the one shown in the image will appear. Select Bitget as the broker name and enter your account number using half-width numerals. For account type, select "Regular Account" if you are doing regular discretionary trading or using your own EA
While there is an option for a dedicated account for MoneyChat EAs, this is only for those who wish to use EAs within MoneyChat's EA menu, so please select "Regular Account"
Step 4
Once approved, it's complete
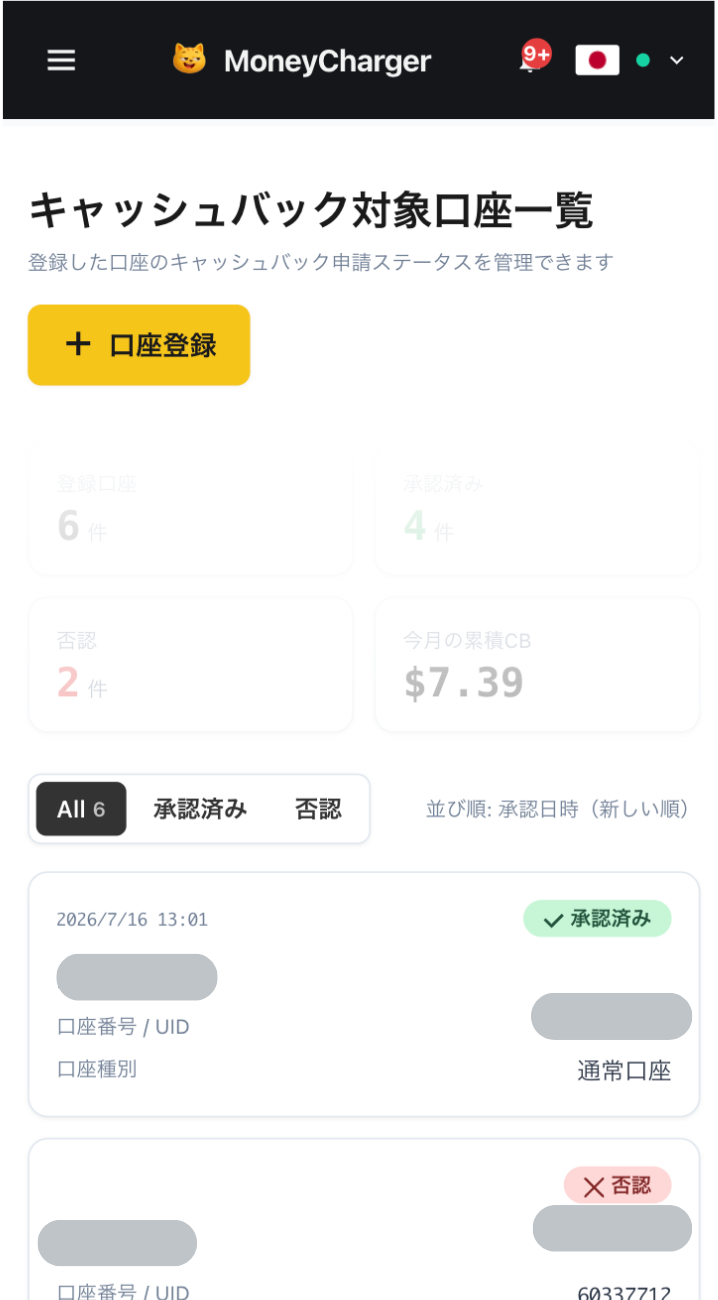
Once you see this screen, your application is complete.
After submitting your application, if there are no problems with your application details, the status at the bottom of "Account Registration" will change to "Approved" within one business day.
Cashback on your transactions will be reflected from the time the status changes to "Approved".
[Caution] Cashback will not be provided if you trade using an account that has not been approved. Please be aware of this